 Save to Pinterest
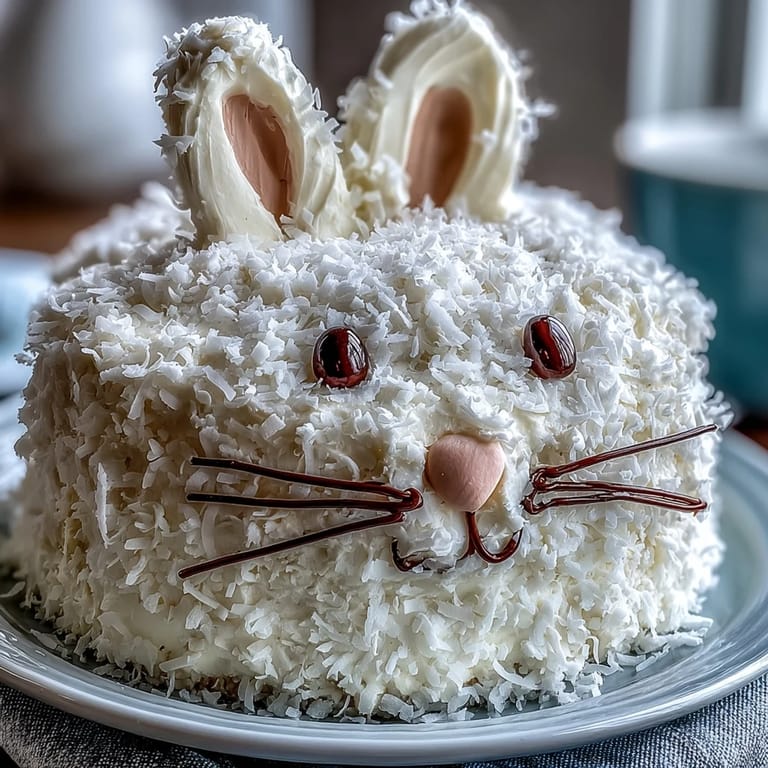
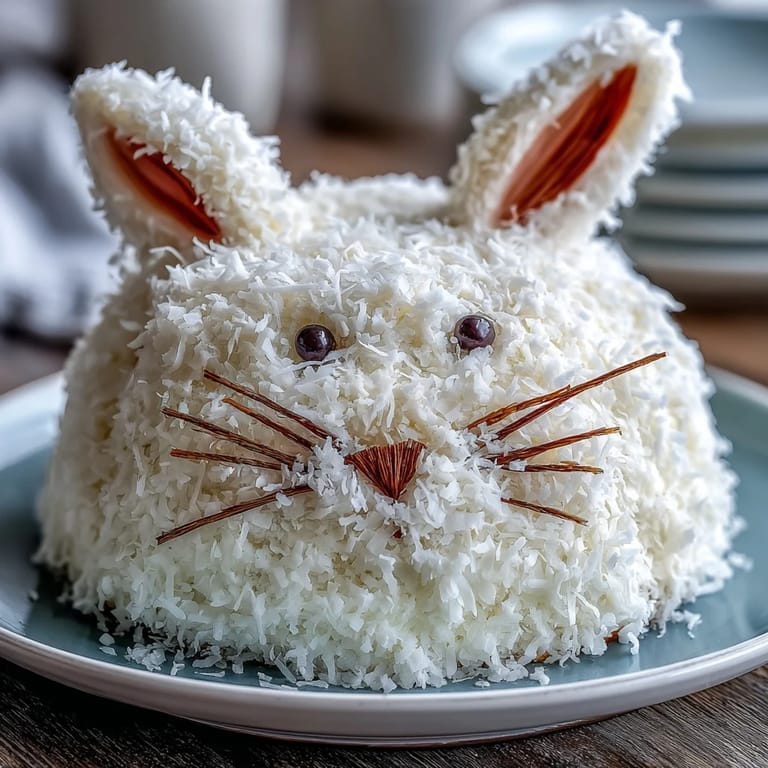
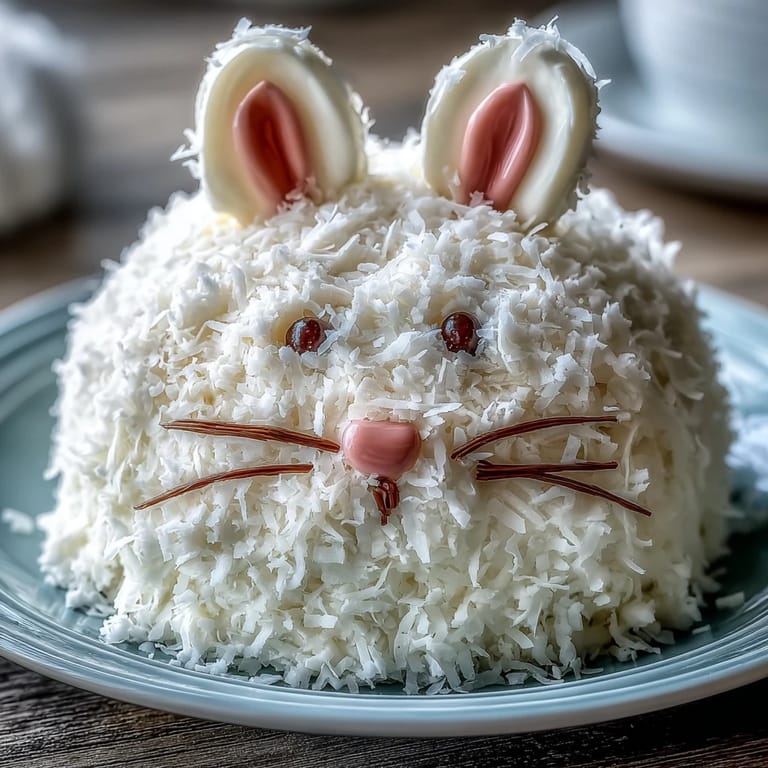
 My daughter came home from school with a drawing of a bunny face, and I knew immediately what Easter dessert we were making. There's something magical about transforming two simple cake layers into a creature that makes kids light up the moment they see it on the table. The coconut frosting isn't just decoration—it's what gives this bunny its charm, soft and fluffy like the real thing. What started as a Pinterest scroll one March afternoon became our family's Easter tradition, complete with the chaos of deciding whose job it was to arrange the licorice whiskers.
I'll never forget the Easter when my sister insisted on helping frost the bunny, and we ended up laughing so hard at her lopsided ears that we didn't even care they weren't symmetrical. The cake still tasted perfect, and honestly, the messiness made it feel more real, more homemade. That's when I learned that baking doesn't have to be picture-perfect to be memorable—it just has to be made with someone you enjoy spending time with.
Ingredients
- All-purpose flour (2 ½ cups): This is your structure—don't skimp on measuring or pack it too tightly into the cup, or your cake will be dense instead of tender.
- Baking powder (2 ½ tsp): This gives the cake its lift and airiness, essential for that cloud-like crumb that makes each bite feel light.
- Salt (½ tsp): A tiny amount of salt actually brightens the vanilla flavor and keeps the sweetness from being one-dimensional.
- Unsalted butter (1 cup for cake): Room temperature butter creams properly, trapping air bubbles that create the tender texture.
- Granulated sugar (2 cups): This isn't just sweetness—it's what helps create that light, fluffy crumb when beaten with butter.
- Eggs (4 large): Room temperature eggs incorporate better and create a richer, more cohesive batter.
- Pure vanilla extract (1 tbsp): Pure extract makes a noticeable difference compared to imitation; don't waste this on a cake that deserves it.
- Whole milk (1 cup): The acidity balances the richness and keeps the cake moist without being heavy.
- Unsalted butter (1 cup for frosting): Soft butter is non-negotiable here—it needs to be almost spreadable when you start beating.
- Powdered sugar (4 cups, sifted): Sifting removes lumps that would create a grainy frosting instead of silky smooth.
- Whole milk (¼ cup for frosting): This adjusts the consistency to spreadable perfection without making it runny.
- Sweetened shredded coconut (2 cups): The coconut is your texture and visual appeal—it makes the bunny look authentically fluffy and soft.
- Pink food coloring: A few drops go a long way for the bunny's ears and nose without making them artificial-looking.
- Jelly beans or candy-coated chocolate eggs: Use these as eyes—they should be bright and cheerful to match the bunny's personality.
- Licorice strings: These become whiskers that add character and make the face feel alive.
- Mini marshmallows: Soft and nostalgic, they work as cheeks and a pom-pom tail.
- Black edible gel or chocolate chips: These create the nose and pupils that bring the whole face into focus.
Tired of Takeout? 🥡
Get 10 meals you can make faster than delivery arrives. Seriously.
One email. No spam. Unsubscribe anytime.
Instructions
- Get your pans ready and heat the oven:
- Preheat to 350°F and grease and flour two 9-inch round pans thoroughly—this is the one step you can't skip if you want your bunny to come out cleanly. Set them aside while you mix the batter so everything moves smoothly.
- Combine your dry ingredients:
- Whisk together flour, baking powder, and salt in a bowl, making sure there are no lumps hiding in the corners. This pre-mixing ensures the leavening is evenly distributed throughout your cake.
- Cream the butter and sugar:
- Beat them together for a full 3 minutes until the mixture is pale and fluffy, almost like whipped cream. This is where the magic happens—you're literally beating air into the batter, which creates that tender crumb.
- Incorporate the eggs one at a time:
- Add each egg, beat well until it's fully incorporated, then move to the next one. This prevents lumpy batter and helps everything emulsify smoothly together.
- Add the vanilla and alternate wet and dry ingredients:
- Start with flour, then milk, then flour again, and stir until just combined—don't overmix or you'll develop gluten and end up with a tough cake. The key is knowing when to stop, even if a few streaks of flour remain visible.
- Divide and bake:
- Pour batter evenly between your prepared pans and smooth the tops with a spatula. Bake for 30-35 minutes until a toothpick comes out clean and the tops are golden.
- Cool with patience:
- Let the cakes rest in their pans for 10 minutes so they can set slightly, then turn them out onto wire racks to cool completely. Trying to frost a warm cake will only end in melted sadness.
- Make the frosting while cakes cool:
- Beat the soft butter until creamy, then gradually add powdered sugar, milk, and vanilla extract, beating until light and fluffy. Taste as you go—if it needs more vanilla, add a little more.
- Tint a portion pink:
- Set aside ½ cup of white frosting and add pink food coloring drop by drop until you get a soft bunny-ear pink. Remember that a little color goes a long way, especially if you want it to look natural rather than neon.
- Shape your bunny:
- Once cakes are completely cool, cut one round cake to create ears and a bow tie using a bunny template as your guide. Arrange the pieces on a large board or platter: one round for the face, two ear shapes above, and the bow tie below the chin.
- Apply a crumb coat:
- Spread a thin layer of white frosting over the entire assembled bunny to seal in any crumbs. Chill for 15 minutes so this base layer sets before adding the final coat.
- Generously frost and coconut-coat:
- Apply a thick layer of white frosting all over the bunny, then immediately press shredded coconut into every surface while the frosting is still sticky. Work in sections so the frosting doesn't set before you get the coconut on.
- Add the pink details:
- Fill in the bunny's inner ears and nose with the pink-tinted frosting, creating dimension and personality. Use an offset spatula or the back of a spoon to smooth it slightly.
- Decorate the face:
- Place jelly beans or candies for eyes, chocolate chips or edible gel for the nose, licorice strings for whiskers, and mini marshmallows for cheeks and a tail. Step back and admire your creation—you've just made edible art.
 Save to Pinterest
 There was a moment last Easter when my nephew, who's usually skeptical about homemade things, took one look at this bunny sitting on the dessert table and his whole face changed. He asked if he could eat the nose first, and we all laughed while he carefully removed a marshmallow cheek. That's when I realized this cake isn't just about the flavors or the texture—it's about creating a moment where everyone at the table feels a little bit of wonder.
The Magic of Coconut Frosting
Coconut frosting is different from regular buttercream because the shredded coconut adds both texture and visual interest that make it feel special. When you press the coconut into the frosting while it's still sticky, it adheres beautifully and creates that fluffy, almost fur-like appearance that transforms a simple bunny shape into something genuinely charming. I learned this the hard way by trying to add coconut after the frosting had set—it just rolled off like I was decorating a greased pan. The warmth of your hands and the stickiness of fresh frosting are your allies here.
Make-Ahead Strategy
One of the greatest gifts you can give yourself with this recipe is baking the cake layers the day before your celebration. Wrapped tightly in plastic wrap, they'll stay moist and fresh, and you'll have one less thing to worry about on the day you're hosting or celebrating. The frosting can even be made hours ahead and stored at room temperature in an airtight container; just give it a quick stir before using.
Creative Variations and Final Touches
This bunny is a blank canvas for your own creativity and preferences, so don't hesitate to adapt it to what you love. Toasted coconut adds deeper flavor if you want something more sophisticated, and cream cheese frosting brings a tangy richness that balances the sweetness beautifully. The decorations can reflect what's available or what appeals to you—use marshmallows for a softer look, or mini candies for something more colorful and modern.
- Toast your coconut in a dry skillet over medium heat for 2-3 minutes before using it if you want a more complex, nutty flavor.
- Pair this cake with something light like Moscato wine for the adults or fresh lemonade for a complete spring celebration.
- If you're making this ahead, assemble the bunny shape the morning of serving so the coconut stays fluffy and fresh-looking rather than sitting for hours.
 Save to Pinterest
 Making this Easter Bunny Cake has become less about following a recipe and more about creating a tradition that brings people together. Every time you set this fluffy, coconut-covered bunny on the table, you're offering not just dessert but a little bit of springtime joy and homemade magic.
Recipe FAQs
- → How do I achieve the fluffy texture of the coconut frosting?
Beat softened butter until creamy before gradually adding powdered sugar and milk. Continue beating until the mixture is light and fluffy for the perfect frosting consistency.
- → What is the best way to shape the bunny features?
Use a serrated knife to carefully cut one cake layer into ears and a bow tie shape, then assemble on top of the main round cake to form the bunny silhouette.
- → Can I prepare the cake layers in advance?
Yes, cake layers can be baked a day ahead, tightly wrapped, and stored to maintain freshness until assembly.
- → Are there alternatives to shredded coconut for frosting decoration?
Toasted coconut adds a deeper flavor, and cream cheese frosting can be used for a tangier finish.
- → What beverages pair well with this cake?
Light Moscato or lemonade complements the cake's sweet vanilla and coconut flavors for a refreshing pairing.