Save to Pinterest
 My aunt pulled a tray of these golden pastries from her oven during a Boxing Day gathering, and the whole kitchen filled with this intoxicating blend of warm spices and buttery dough. I watched her arrange them on a platter, steam still rising, and she caught me reaching for one before they'd cooled. She laughed and said these little tourtières were her secret weapon for looking effortless when really they just taste like you spent all day in the kitchen. That afternoon, between conversations and carols, I realized why these bites kept disappearing from the plate faster than anything else she'd made.
I made these for the first time when my sister asked me to bring something to her work holiday party, and I nearly panicked because I'd never worked with cream cheese pastry before. But something about the method felt forgiving, and when I pulled that first batch out of the oven, I realized I'd stumbled onto something I'd want to make again and again. The best part was watching people's faces light up when they bit into one, and honestly, that made me want to master this recipe.
Ingredients
- Cream cheese, softened: This is the secret to the tender, almost melt-in-your-mouth crust; make sure it's genuinely soft before you start, or you'll have a lumpy mess on your hands.
- Cold unsalted butter, diced: Cold butter creates those precious flaky layers, so don't skip the chilling step and don't let it warm up while you're mixing.
- All-purpose flour: Don't pack it when you measure; spoon it in and level it off, or you'll end up with dry, tough pastry.
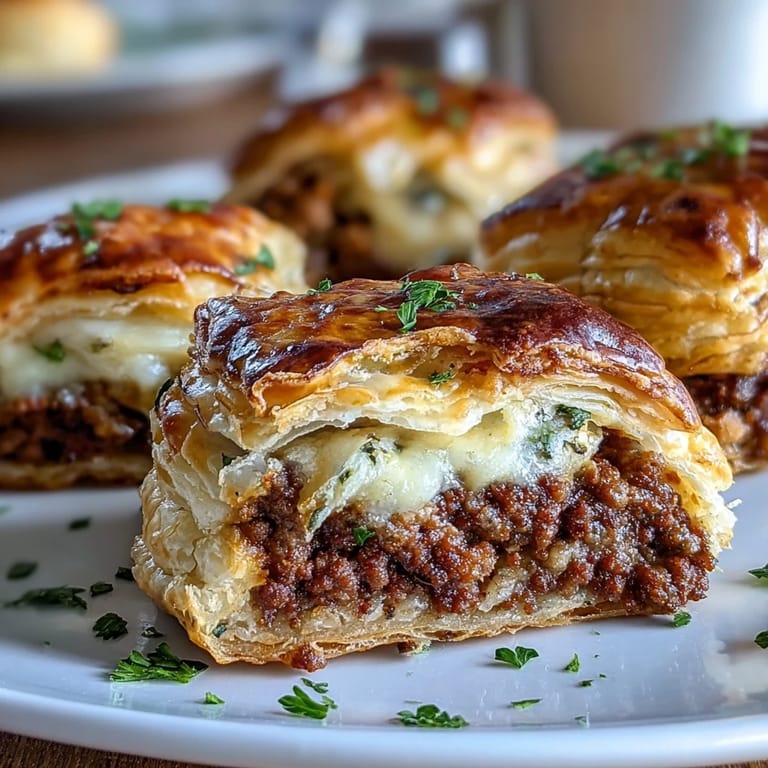
- Ground beef: A blend with a little fat (around 80/20) works better than ultra-lean; it'll stay moist and flavorful as it cooks.
- Onion and garlic: These are your flavor foundation; take time to cook the onion until it's truly translucent and soft, not just pale.
- Spice blend (allspice, cinnamon, cloves, thyme): This combination is the soul of tourtière; fresh spices make a real difference, so check your bottles if they've been sitting around for years.
- Beef broth: This keeps the filling moist without making it soupy; simmer it down until most of it's absorbed so the pastries don't get soggy.
- Egg wash: A beaten egg creates that beautiful golden-brown finish and tells you exactly when they're done baking.
Tired of Takeout? 🥡
Get 10 meals you can make faster than delivery arrives. Seriously.
One email. No spam. Unsubscribe anytime.
Instructions
- Make your pastry dough:
- Blend the softened cream cheese and cold butter together until they're completely smooth and uniform. Add the flour and salt, mixing gently until just combined into a soft, supple dough that holds together.
- Chill and rest:
- Divide the dough in half, flatten each piece into a disk, wrap them in plastic, and let them sit in the fridge for at least 30 minutes. This resting time is non-negotiable; it relaxes the gluten and makes the pastry way easier to work with.
- Brown your filling:
- Melt butter in a skillet over medium heat, then cook your finely chopped onion slowly until it turns soft and translucent. Add garlic for just a minute, then crumble in the ground beef and let it brown, breaking it apart as it cooks.
- Season and simmer:
- Stir in all the spices, salt, and pepper, then pour in the beef broth and let it bubble away until most of the liquid evaporates and the filling looks rich and cohesive. Stir in the parsley if you're using it, then set the filling aside to cool completely.
- Preheat and prepare:
- Heat your oven to 200°C (400°F) and line two baking sheets with parchment paper. This setup ensures even baking and makes cleanup almost painless.
- Roll and cut:
- On a lightly floured surface, gently roll out your chilled dough to about 3 mm thickness. Use a 7 cm round cutter to create circles, working carefully and re-rolling the scraps as needed.
- Fill and seal:
- Place half your pastry circles on the prepared sheets, spoon about a teaspoon of cool filling onto each one, then dampen the edges with water. Top each with another pastry circle and press the edges firmly with a fork to seal, creating a little decorative edge.
- Finish and bake:
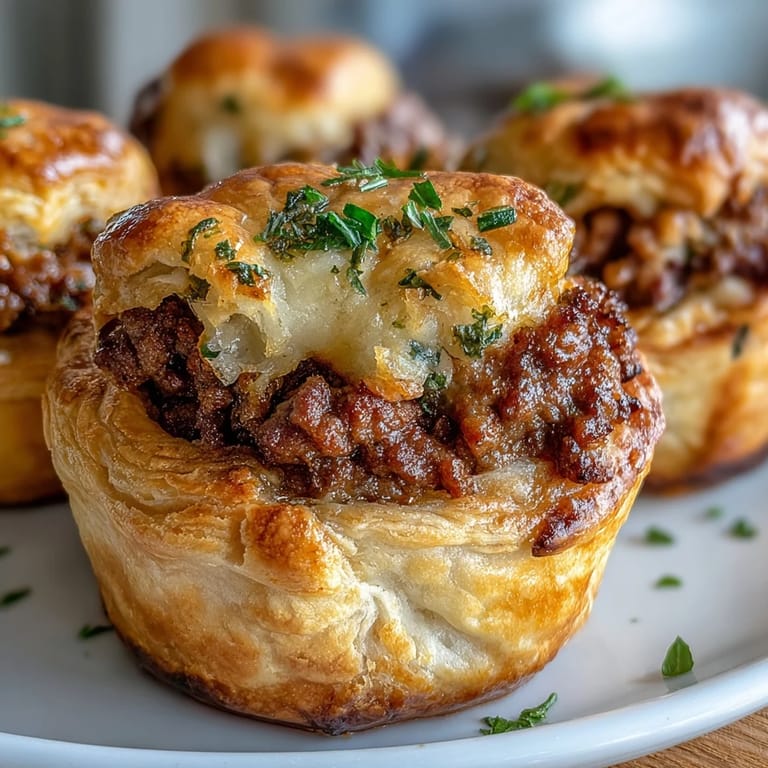
- Brush the tops with beaten egg and use a small knife to cut a tiny steam vent in each pastry. Bake for 18 to 22 minutes until they're deep golden brown and the kitchen smells like Christmas.
 Save to Pinterest
 There's a moment during the holidays when someone takes a bite of one of these, closes their eyes, and just goes quiet for a second. That's when you know you've made something that tastes like care, like tradition, like the kind of thing people remember. It's wild how something that takes less than an hour can feel like you've given someone a little gift.
The Spice Story Behind Tourtière
The combination of allspice, cinnamon, and cloves isn't random; it comes from an old French-Canadian tradition where tourtière was built on warm spices that suggested abundance and celebration. When you smell that blend toasting in the beef, you're tapping into something that's been made in Quebec kitchens for generations. The cinnamon especially surprised me the first time I noticed it, but it adds this subtle sweetness that makes people lean in for another bite without quite knowing why.
Pastry Variations and Shortcuts
I've tried these with store-bought phyllo sheets when I was rushed, and they work fine, but the cream cheese pastry is genuinely better because it's sturdy enough to hold the filling without tearing, and it browns more evenly. Some people use puff pastry, which is good if you like something airier, but it can overshadow the filling. The cream cheese version strikes that perfect balance where the pastry is a real player, not just a vehicle.
Serving and Storage Tips
These are best served warm or at room temperature, and they hold beautifully on a platter for a couple of hours without getting greasy or stale. I've reheated them gently in a 150°C oven for about five minutes, and they come back to life almost as well as the first time. If you're making these ahead, the raw assembled pastries can be frozen for up to a month, and you can bake them straight from frozen, just add a few extra minutes to the baking time.
- Serve them with cranberry chutney or sharp Dijon mustard for a flavor contrast that elevates the whole experience.
- These pair beautifully with a crisp white wine or a light beer if you're serving them at a gathering.
- If you're making them ahead, cool them completely before stacking and storing, or they'll stick together.
 Save to Pinterest
 These little pastries became my go-to when I wanted to bring something that felt special without turning myself inside out in the kitchen. They're the kind of recipe that rewards you every time you make them, whether you're cooking for a crowd or just for yourself.
Recipe FAQs
- → Can I make the pastry dough ahead of time?
Yes, the cream cheese pastry can be prepared up to 2 days in advance and stored in the refrigerator wrapped in plastic wrap.
- → What can I serve with mini beef tourtières?
These pair wonderfully with cranberry chutney, Dijon mustard, or fruit preserves for a sweet and savory contrast.
- → Can I freeze these before baking?
Absolutely. Assemble the tourtières, freeze on a baking sheet, then transfer to a freezer bag. Bake directly from frozen, adding 3-5 minutes to the cooking time.
- → Why do I need to cut a slit in each pastry?
The small slit allows steam to escape during baking, preventing the pastries from becoming soggy and ensuring a crisp, flaky texture.
- → Can I substitute the ground beef with another meat?
Yes, ground pork, turkey, or a beef-pork blend work beautifully. Adjust seasoning to taste as different meats have varying flavor profiles.
- → How do I prevent the pastry from becoming tough?
Keep the butter and cream cheese cold, handle the dough minimally, and refrigerate it adequately before rolling. This ensures a tender, flaky result.